
Introduction:
 As a web designer and former jeweler, I come across a lot of jewelers websites that have horrible jewelry photography which is very unfortunate since the sparkle is what sells our jewelry. The lack of equipment or know-how is often the main problem especially for smaller stores.
Taking pictures of jewelry is an art in itself. The reflection of the surrounding in polished jewelry, the lighting situation and getting the details pose some problems that are very unique to jewelry.
Ideally, every jeweler would have their own set up with a nice camera with a macro lens and a photo booth so they could keep their website updated with current inventory and show their jewelry in it’s best looking state – with a lot of sparkle and beauty… and not to forget a “professional photographer on staff”.
Your Jewelry Photography Set-Up:
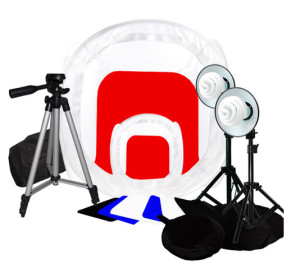 Almost anything can be touched up or corrected in Photoshop, except blurriness. Make sure you have a sharp image of your item with decent lighting – not too washed out and not too dark. You don’t need the best, most expensive set-up, especially for websites. The rule is though, the better your initial photo, the better the outcome of your touch-up. We recommend you using a soft box light tent for your photography to reduce reflections. If you have the chance to use regular daylight, take your shots outside for best lighting and always use a tripod!
For information about how to set-up a low-budget photo studio read our article about jewelry photography set-up >>
How can you clean up your jewelry pictures yourself?
There are probably several programs out there that can help with this but I like to use Photoshop and Adobe Camera Raw to clean up and enhance my jewelry photography. For this tutorial, I use Photoshop CS5.
1} White Balance your image:
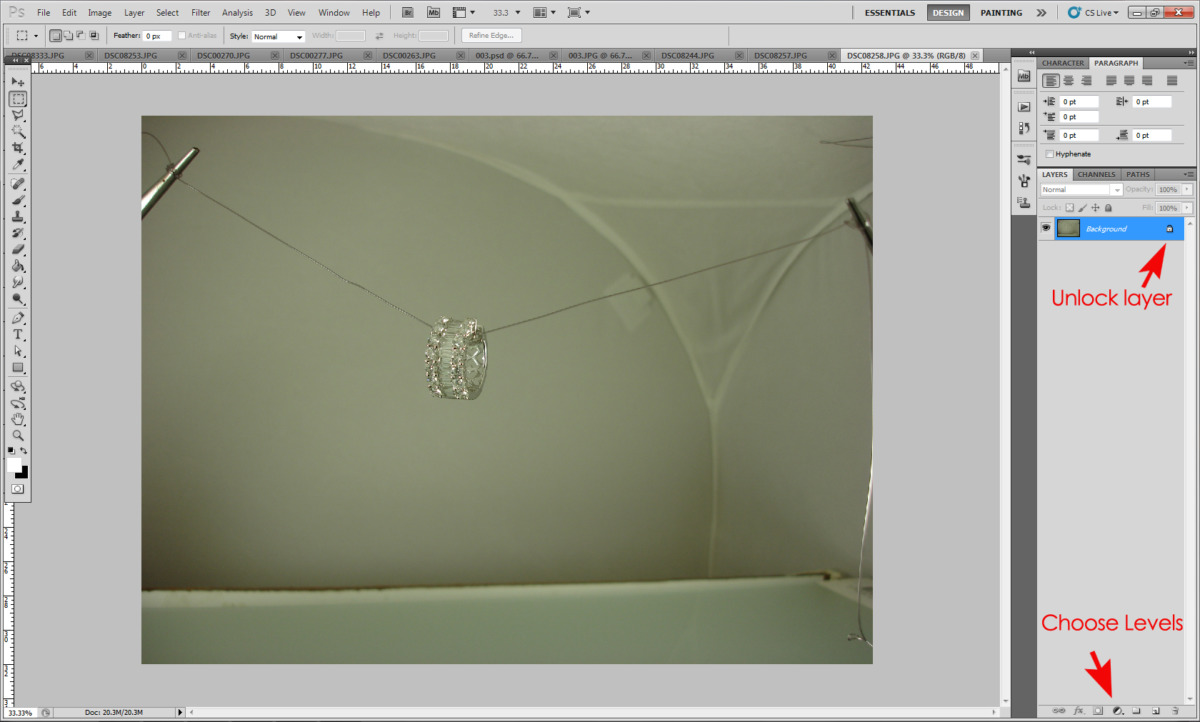
Open up your image in Photoshop and unlock your layer, by clicking on the lock in the layers panel. Click on the adjustment layers – Levels.
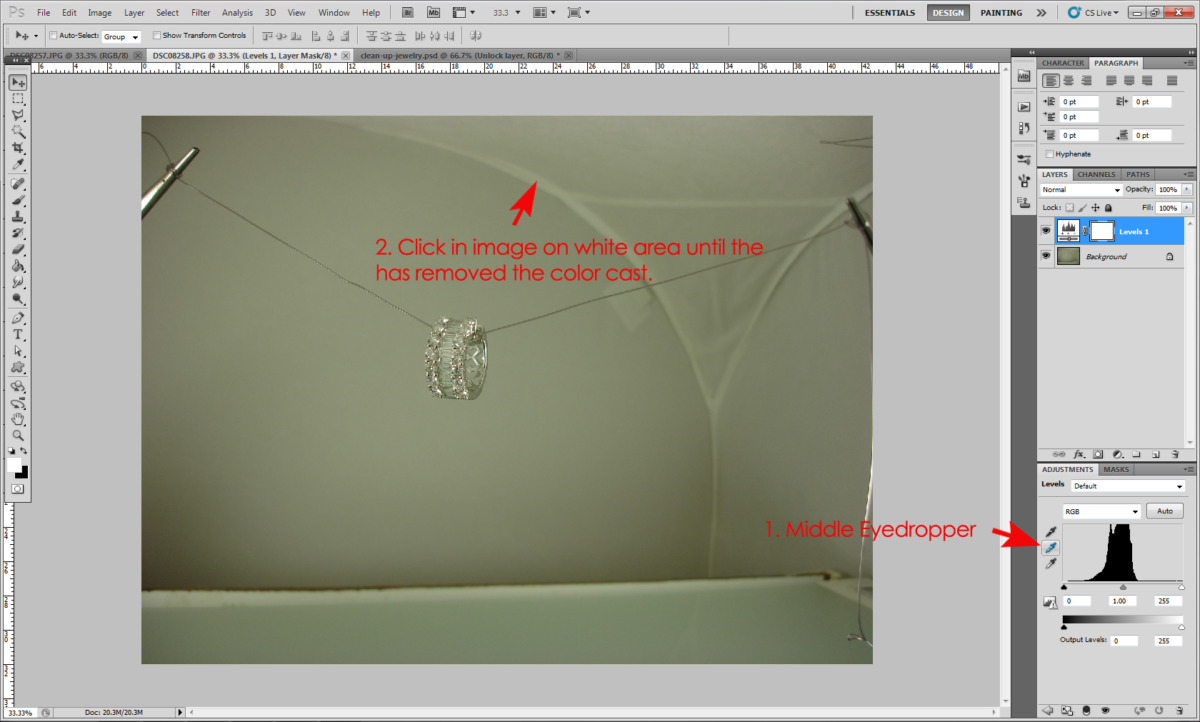
1. Choose the middle eye-dropper in the levels panel and 2. click in the image on a white spot. You might have to click on different spots until you find the best “neutral” color. This removed the color cast which is especially useful if you have a yellow color cast in a photo with yellow gold jewelry.
2} Adjust Brightness:
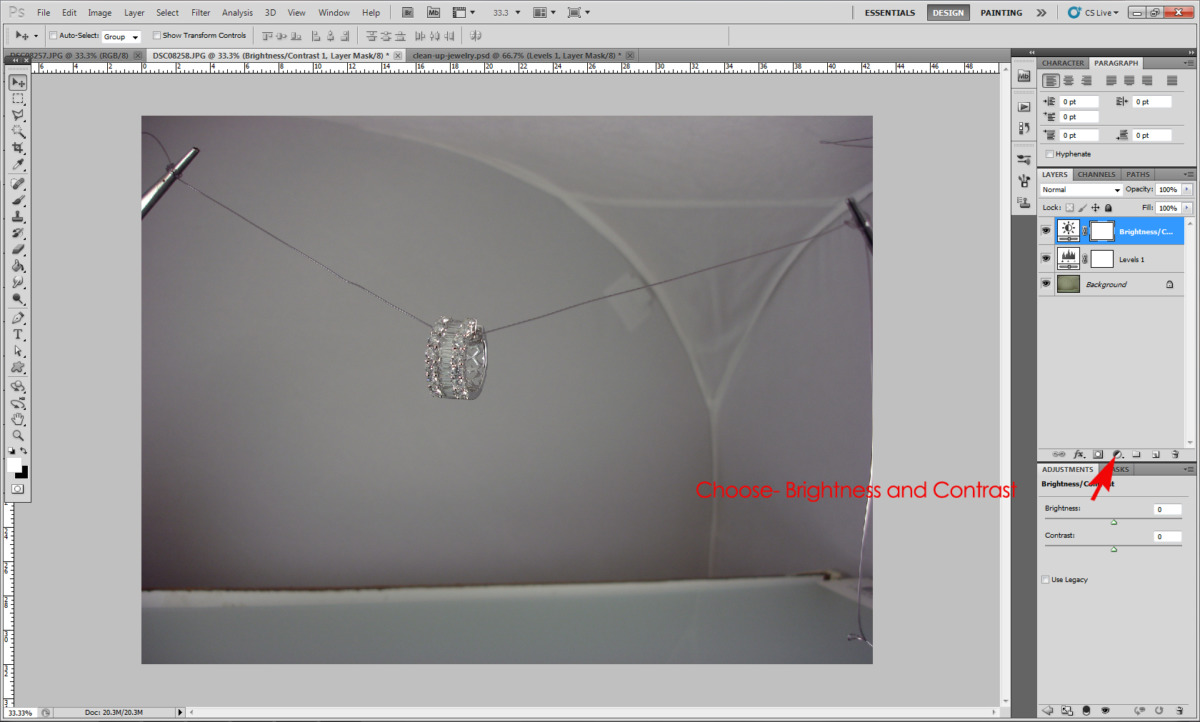
Use the Brightness and Contrast Adjustment Layer to adjust brightness.
3} Get a crisper image with filters:
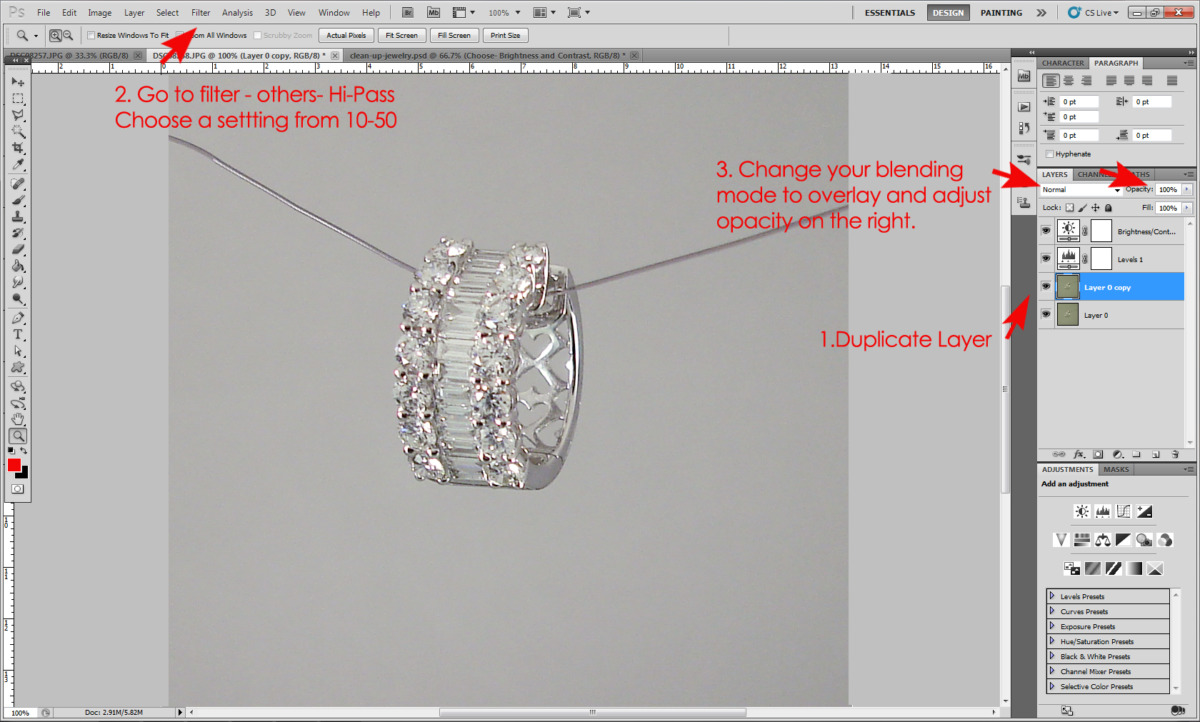
1. Duplicate your layer – layer- duplicate layer and choose the top layer of the two. Go to filter- other- High Pass and choose a setting between 10 and 50. It will most likely look funny. Don’t worry, the magic comes now. 3. Go to your layer blending mode and change it to overlay. This will create a crisper look. You might have to adjust the opacity on that layer especially, if you chose a higher number on the filter.
3} Select the image with the pen tool:

This is where the real tedious work happens. Some people just use the magic wand tool or the lasso tool to select the image but it usually does bot do a very good job and it never is clear enough for print or putting the image on a dark background. You will have to use the pen tool to select the outlines of the piece and all the cut-outs. The pen tool takes practice but if you don’t get a curve right, you can always use the white arrow tool below the T tool to adjust the curve handles or the corners.
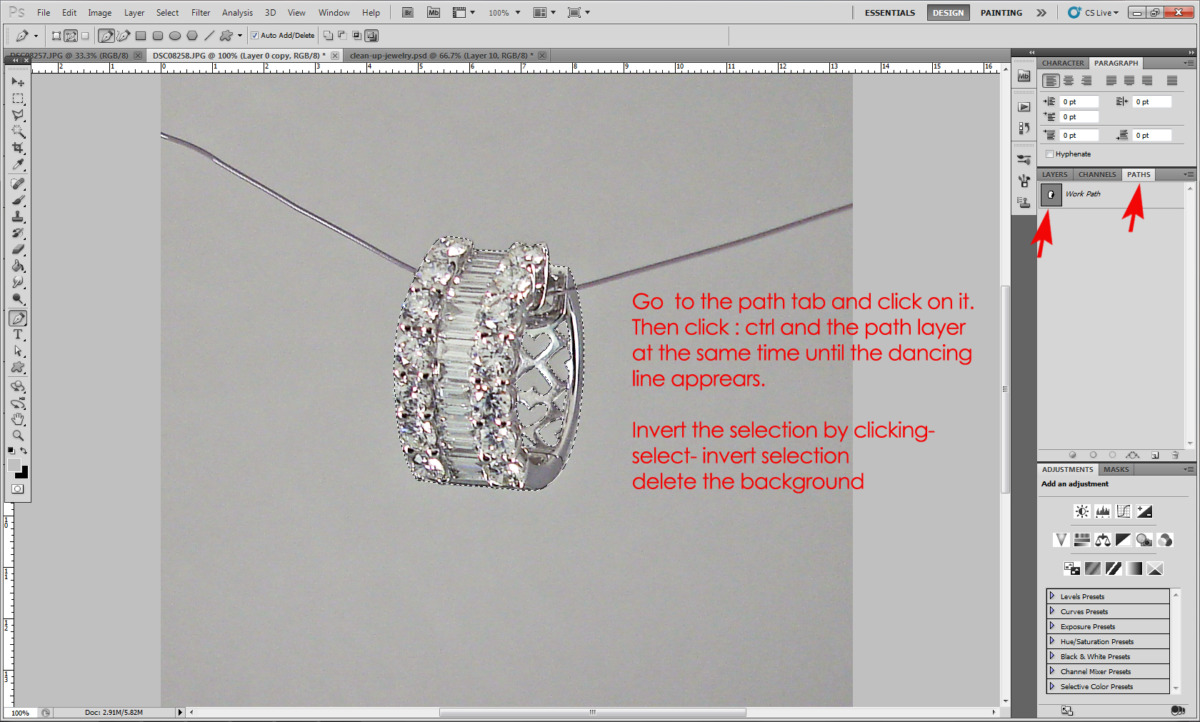
Once selected, click on paths- and control click the path later. This will turn the path into a selection. Go back to your layers panel. Invert the selection and delete the background. You will have to do it on both layers, the original and the overlay layer.
You can now save it as a png to preserve the transparent background. Duplicate and make reflection.
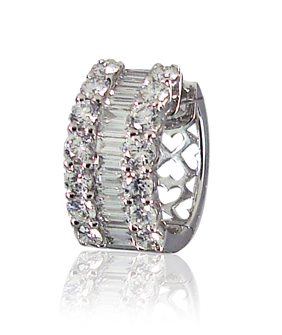
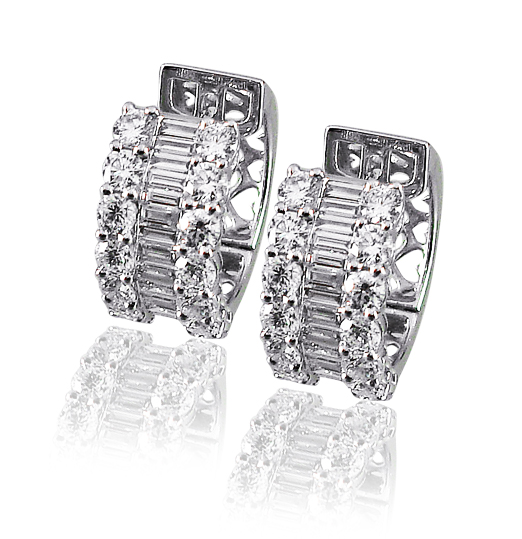
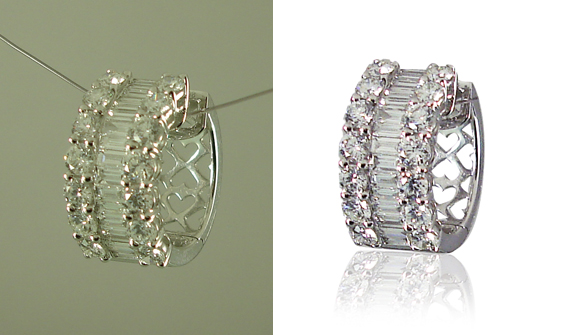
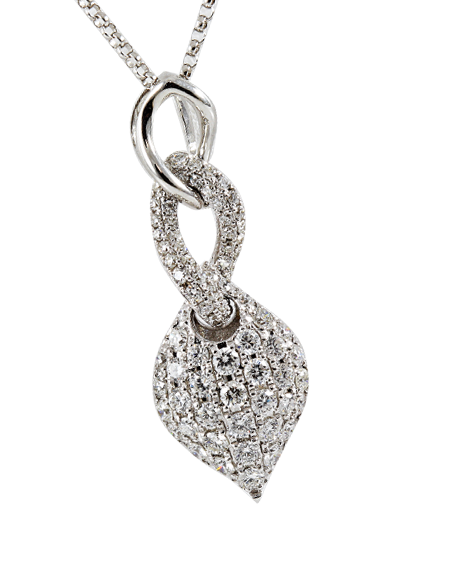
These images above were taken with a Sony Cybershot DSC-W camera, a lower end point-and-shoot in a light tent to show the results one can expect with a cheaper camera. The whole clean-up process for a piece like this is about 25 minutes. The better the photography, the less clean-up time required.
Jewelry Photography Services:
 Jewel Web & Design offers jewelry photography for local businesses in Vista, Oceanside and surrounding areas in San Diego County. We are able to arrange an on-site photo session (please, contact us for rates) with our mobile set-up.
For businesses further away, jewelry would have to be mailed to us. We understand that you can’t just send out every new piece of jewelry or your whole inventory to have it photographed to some random company on the internet.
For that reason, we have compiled an article about how you can set up your own photo booth without breaking the bank. That will make it easier for you to take the photography and we can clean it up for you.
Read our article about jewelry photography set-up >>
Jewelry Photoshop Clean-up:
![]() If you have a camera with a macro function, and some basic set-up, we would be glad to do our best to “glamorize” your jewelry photos and make them “internet” ready for you. Email us your pictures and we can touch them up and remove the background for you.
If you have a camera with a macro function, and some basic set-up, we would be glad to do our best to “glamorize” your jewelry photos and make them “internet” ready for you. Email us your pictures and we can touch them up and remove the background for you.
Photoshop clean up rates are $95/hour (most pieces can be cleaned-up within 10-30 minutes depending on the complexity of the piece). For more accurate quotes, please contact us with a picture of your original photo and ideally one that shows what you hope to achieve.
No matter how great your set-up or photography is, if you want to produce an ad with colored backgrounds, you will need to cut out your jewelry from the background. See a few examples of such ads, shot with a DSLR and other cameras.